

DIY: King Size Storage Bed Part 3- Footboard
8:29 AM
Okay, we are ready to make the footboard for this bad boy. It's about time, right? Since my hubby made the bed, he will take it from here.
Start out making the front panel of the footboard. I followed the same procedure to get the recessed panel look as was done on the drawer panels. First, make a 1/4" deep x 3/4" tall lip on the inside back face of the 3/4" x 2-1/2" pine boards. Second, cut 1/4" plywood to fit in the recesses. Third, secure 1/4" plywood to the rectangular frame of pine boards.

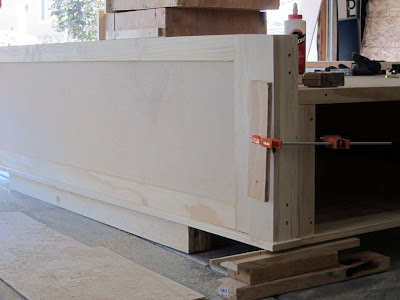
This is what the front of the footboard looked like after the 1/4" panel was attached to the vertical and horizontal trim.

Place two 2 x 4 studs along the length of the frame. These studs will act as spacers and to give the footboard some rigidity.

Cut a piece of OSB to the same overall dimensions of the rectangular panel, 19" x 73", and secure it to the studs.

Cut a piece of 1/4" plywood to the same dimensions as the OSB, 19" x 73", and secure it to the OSB. This will give the visible portion of the back of the footboard a cleaner appearance when finished.

For the side posts I glued four 3/4" x 3-1/2" pine boards together to get a post dimension of 3" x 3-1/2".

I had to do some sanding to get the built-up post to appear as a solid piece.

The following photo will show the result of the next couple steps. The center frame of the footboard is approximately 2-7/8" thick (this is because the plywood wasn't actually 1/4", it was 5mm and the OSB wasn't 1/2", it was 7/16"). Using 7/16" OSB and 5mm plywood actually worked out very well here. If I would have used exactly 1/2" OSB and 1/4" plywood then there wouldn't have been the small difference in thickness between the post and center frame - which I think looks nice.
Connect the posts to the center frame of the footboard such that the back of the footboard and post are flush, if using 7/16" OSB and 5mm plywood there will be approximately 1/8" of difference in thickness.
Cut a piece of 3/4" X 3-1/2" pine board such that there is about 1/2" of overhang on the front and sides of each post. This pine board should be secured to the post and center panel so that the back of all three pieces are flush.

I attached the footboard to the center compartment and drawer receivers with a system of 2 x 4's and lag screws. In the picture below I show the system in place without the footboard attached so it can be seen how it works. The full-length 2x4's on top and bottom will actually be attached to the footboard when the project is completed. The shorter lengths in the middle were attached to the each of the center compartment and drawer receivers. These short pieces bear upon the lower full-length 2x4 to ensure the middle compartments and the footboard sit at the same desired height. Once the middle compartments and footboard were in place, I placed lag screws through the end of each middle compartment and into the full-length, footboard 2x4's.

Here is the unfinished footboard in place.
I made a pattern for the feet that I used at each corner of the bed. I found a piece of 2" thick glulam beam in my garage and cut the feet out of this material.

Here is a picture of the feet for one of the corners of the footboard.

I attached the feet to the footboard so that the drawer compartment rests on the foot but is not attached.

The trim on top was the last step.

I used a piece of 3/4" pine board to fill in the gap that was created at the back of the footboard.

The overall dimensions for the footboard are 25-1/4" x 3" x 80".
I highly suggest that anyone who may attempt this project sketch out the bed and its components and create your own Cut/materials list. I am providing my list to be used as a "check."
Cut/Materials List:
2 - 3" x 3-1/2" x 19" (post, glued pine boards)
2 - 3/4" x 2-1/2" x 19" (vertical trim for panel, pine board)
2 - 3/4" x 2-1/2" x 68" (horizontal trim for panel, pine board)
1 - 1/4" x 14-1/2" x 68-1/2" (center panel, plywood - thickness of plywood was actually 5mm)
164" (approx.) - 1/4" to 1/2" (decorative trim, any material type)
2 - 1-1/2" x 3-1/2" x 73" (internal horizontal frame, 2 x 4 pine board)
1 - 1/2" x 19" x 73" (back panel, OSB - thickness of OSB was actually 7/16)
1 - 1/4" x 19" x 73" (back panel cover, plywood - thickness of plywood was actually 5mm)
1 - 3/4" x 3-3/4" x 81" ( top plate, pine board - I used pine 3-1/2 pine board and a 1/4 rectangular piece of pine to get the 3-3/4" dimension)
86" (approx.) - 3/4" x 3/4" (decorative top trim, any material type)
1 - 3/4" x 3-1/2" x 81" (bottom plate, pine board)
2 - 4" tall feet (any material)
Click on the following to see the other bed frame posts.
Stephanie & Her Engineer Hubby


10 comments
Could you tell how much it cost to make the storage bed
ReplyDeleteIs the headboard a separate piece? I love that you have the insert, do you have instructions for the headboard?
ReplyDeleteDo you have the instructions for the headboard? it's beautiful!
ReplyDeleteMary we have a google search bar on the side of our blog. Just google headboard and it will pop up. Thanks!
ReplyDeleteI know this blog hasn't been active in a while, but had to ask. Is the weight of the bed resting all on the head and footboard, or are there legs under each section for added support?
ReplyDeleteThere are about 8 blocks supporting the bed from underneath.
DeleteDo you have the total shopping list without the cuts?
ReplyDeleteSorry but I don't.
DeleteGreat Job ! Can i suggest just one thing? Please consider using either peg board or drill holes all over the tops of the base units! Unfortunately us Humans perspire and unless vented it will cause your mattress to go mouldy ! and you don't wanna be breathing fungus in a year or so from now !
ReplyDeleteTake Care
Sending lots of love from the Emerald Isle
Queen size - If you want to make a Queen size bed frame, it needs to be 16" narrower and the length stays the same. Some ideas - you could eliminate the center console or reduce the depth of the drawers 8". You would also have to reduce the headboard and footboard 16".
ReplyDelete