


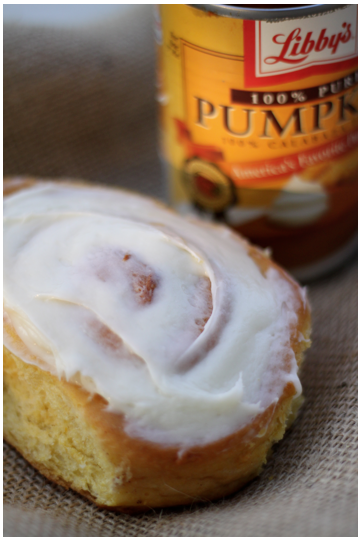
Last weekend I went for a long run up in a beautiful canyon here in Utah. Although it is still August I was amazed at all the fall colors I saw up there. Those fall colors, and the long run made me crave something sweet. I decided to take my mom's famous roll recipe and make it with a twist. Did you know that you can replace butter in baking with pumpkin puree? If a recipe calls for 1 cup of butter simply change that to 1/3 cup pumpkin puree and 2/3 cup butter instead. Those ratios work for any baking recipe.
Here is my mom's AMAZING roll recipe that I have adapted with a little fall deliciousness.
In a small bowl:
2 C warm water
2 T yeast
2 T sugar
In a Bread Mixer:
3 eggs
2/3 C butter
1/3 C pumpkin puree
1 C sugar
1 1/2 t salt
Add ingredients from the small bowl.
7-8 C flour
Make before bed and let rise on the counter over night in a large bowl. Make sure to cover. In the morning punch down and roll flat.
Melt 1/2 a stick of butter and brush onto the rolled out dough. Sprinkle with sugar, cinnamon and a tiny bit of nutmeg.
Roll up the dough into a tube/log and cut into small rolls. Place each roll onto a greased cookie sheet, or even casserole dish.
Don't get what I just said?! Here is a clip that might help....
Cover and let rise until doubled.
Bake @ 350 for about 10-12 min or until golden brown.
Let cool and make this AMAZING cream cheese frosting I found HERE.
-Megan
This post brought to you by Create the Good. The content and opinions expressed below are that of Do It Yourself Divas.


Our father is the perfect example of Creating the Good. He is the most giving man that we know. Some of our greatest memories of our childhood were of him buying turkeys and hams and doorbell ditching them to neighbors and friends each holiday season.
There is nothing that we would love to do more than instill this sense of giving in our own children. We decided to follow his example, and do a little doorbell ditching ourselves.
We were beyond excited when approached with the Challenge to Create the Good.
We decided to Create the Good in our own community. It was a simple gesture, but one that is sure to leave an impression with our own children and those that we served.

There are so many in need. In our particular area, there is a sweet family whose father was just diagnosed with brain cancer. He has undergone surgery. His amazing wife has had to be so strong for her six children during this trial. Steph and I really wanted to get our kids involved in spreading some love to this incredible family. Although it wasn't much, it was still something. Something to brighten their day and hopefully let them know they are loved and thought of.


We even made my husband disguise himself for the drop off. We wouldn't want our cover to be blown.

This is the perfect season to give! Are you wondering how you can give back to your community?? Join us in 25 Days, 25 Ways to Give campaign. By registering, you will have the incredible opportunity to find those in your area and community who need you and your service. Just in our little community there are nursing homes that need visitors and soup kitchens that need servers. We can't wait to visit our local nursing home, and sing Christmas carols to the residents there. There are so many opportunities to serve. Create the Good makes finding service opportunities easy.
We love this quote, and believe it to be true...

By registering, you will be entered to be one of 25 winners for a $100 gift card or the grand prize of a trip to Smuggler's Notch Resort in Vermont. Once you sign up, you can begin Creating The Good at anytime during the 25 days.
Let's do this! We are registered and can't wait to accept the challenge to Create the Good! Whose with us?
Take a look at our little service project that we did for our friends below! It was beyond fun and we know it will inspire you to Create the Good!
- Meg and Steph
Thanksgiving is fast approaching! This is the first table runner I have ever made or used, and I think it's the begining of many table runner to come. It's so easy to make, incredibly cute, and it fills my home with the Holiday spirit! I adapted this runner from On Sutton Place. Be sure to follow us on Instagram for more fun DIY projects @diydivas2. Here's what I did.

Supplies:
1.5 yards of burlap = 54" long runner
3 yards of ruffle
Hot glue gun
Directions:
-I cut my burlap table runner 16" wide. That means you have enough burlap left over to make two additional runners, or you could use the extra burlap to make the runner longer - just sew two ends together, right sides together.
-Fray the edges of the burlap along the sides by pulling out strings. I pulled out about 4 long strings on each side.
-I cut 6 pieces of ruffle - 18" long.
-Glue the ruffles onto the burlap in rows, leaving an inch of ruffle hanging over the sides. Fold the extra ruffle over the back and glue down for a clean edge. Follow the directions here for more information.

-Steph


About Expressions Vinyl
Expressions Vinyl is a vinyl distribution company that supplies affordable vinyl cutters and vinyl for fun crafts and DIY projects. We wanted to inspire some DIY Thanksgiving projects. We love DIY projects even if it's not with vinyl. Happy Thanksgiving!
Fall is here and so is Thanksgiving! My kids keep asking if they can set up Christmas decorations and get presents. I laugh and tell them not until we give thanks for the wonderful things we have. I think it will help emphasize the Thanksgiving holiday as we go about setting up decorations.
So of course my first thoughts are asking how I can make
some fun decorations that will involve the kids… or not ;-) So here are some great vinyl Thanksgiving decoration ideas
that are simple and the kids will enjoy.
1.
Thanksgiving Word Cloud
It’s fun to have some color and a variety of phrases that
get you thinking of what you are grateful for. With a simple, yet fun word
cloud of thanks you can create an easy way to help the kids remember why we
give thanks.
2.
Grateful Pumpkins
As much as I would love to say you could use the extra
pumpkins from last month (October), I am not sure how well they will hold up.
However, just after Halloween there is going to be some good deals on pumpkins
real or fake. Paint them white or any color and use the vinyl for the letters.
It’s a fun way to bring in the fall season.
3.
Classy Mantle Thanks
This is really simple, however the garland makes it pop. By
simply using some clean glasses from the dollar store and either painting or
using vinyl letters to create a simple phrase.
4.
Plate Full of Blessings
Want to impress the in-laws or friends? Gold vinyl on a
white plate creates a beautiful and elegant contrast for the big feast. Express
your creativity and passion for details with these simple touches. It’s bound
to strike up a conversation.
5.
Blessings All A Glow
Grab the old Mason jar in the pantry and some wire from your
craft box to create a simple and warming jar full of blessings. With many
different ways to design your vinyl décor, this is a great solution for
providing the warmth in your home that makes you feel at home.
I hope you were inspired just as I was! These can be made with the Silhouette vinyl cutting machine right from home or some of these can simply be painted. Which ever you choose, we hope you enjoy making your Thanksgiving DIY projects. Happy Thanksgiving.

I know, I know, it is Halloween eve... I figure why not get a jump on the most wonderful holiday of the year, Thanksgiving. My dad has always said that Thanksgiving is his favorite holiday. When I was young I thought that it was because he enjoyed the food. Now that I am older, I realize that he is a man full of gratitude, and is thankful for the opportunity to recognized what he has. He is such a great example to me.
I want my children to realize all that they have been given. I want them to be full of gratitude and have thankful hearts. This year I am going to strive to make it a point for my three year old, and myself to think of something we are grateful each day in November.
Let me introduce Thankful Tom the Turkey. His feathers are full of things that we are grateful for here at this Diva house. I tried to think of things my little boy would be thankful for: legos, his sister, books, the sun etc. 

This is only an example.
When we actually start this little thankful turkey on Thursday, I will have him decide what pictures to put up. I want him to be in charge and have ownership over this little Thankful turkey. By the end of the month I hope that our turkey will have a full set of feathers full of bright and wonderful things that he is thankful for. I can't wait to see what he comes up with.
Here is how I made him.
Cut out a turkey. I used felt. I just eyeballed it.
Hot glue the pieces together.

Hot glue magnets on the back of your turkey.

Such a cute little face...

Cut out card stock "feathers". There should be enough for each day of the month.


Hot glue a little magnet on the back of each feather.


Each day add a feather with something your child is grateful for.

I will be hanging our Turkey on our garage door in the kitchen (in the inside). This way whenever we leave the home, or are in the kitchen we will see our Thankful turkey and remember all the things we have been blessed with.


I seriously can't wait to start adding feathers!
We are thankful, truly thankful for all that we have.
Happy Holidays!
-Megan

Here's how you make the JUICIEST turkey you will every taste!!! I had no idea it would be so easy. This is another trick I learned from my fabulous mother-in-law :)
This process takes 12-24 hours
Have the turkey thawed, cleaned out, and rinsed off
Grab a 5 Gallon Bucket
(It can fit up to a 24 lb. Turkey)

Dissolve in a pan of water
2 Cups Salt
1 Cup Sugar
Add any spices you want. We used 2-3 tsp of the following. It's all to your preference.
Garlic
Onion
Rosemary
Thyme
Canadian Steak Seasoning
3 or 4 Bay Leaves
Stir and let simmer for a few minutes and then pour it in the bucket.

Add cold water until the bucket is about a third or half way full depending on the size of your turkey.

Add the turkey and add more water if needed to cover the turkey. Make sure the cavity of the turkey is filled with seasoned water.

Cover it and let it sit somewhere cold like the garage since it may not fit in your fridge. 12-24 hours later, remove the turkey and make sure the water is no longer in the cavity of the turkey. Pat dry. Rub oil on-top (season a little if you want) and roast according to the directions on the turkey. A good rule of thumb is that the turkey cooks at 325 degrees for about 20 min per pound.


YUMMY!!
Stephanie

Thanksgiving day is just around the corner and I think this apron looks Thanksgiving-ish. Basically it is our flirty apron revamped. The difference between this Thanksgiving apron and the flirty apron is just in the ruffles. Click here for instruction on how to make a flirty apron. You need to read it to understand this tutorial. That flirty apron was our very first post! I'm feeling a bit nostalgic.
I used 4 yards of muslin. I believe it cost about $3 a yard at Walmart.

Cut out the apron bases according to the "flirty apron" instructions. Take one apron base and lay it out. If you want your apron to have false ties as an embellishment, just cut 3 strips of fabric any width you want. The length of the strips need to be as long as the width of the apron base. Fold each strip in half right sides together and sew it together down the edge. Pull it right side out and lay them across the apron base. At the edge, sew the 3 strips to the apron base as shown in the picture. Set it aside for a moment while you work on the ruffles.
 Each ruffle is 8 inches wide and 42 inches long. They length can vary depending on the size of your apron. Hem the bottom and the sides of the ruffle. Baste stitch the top and pull the thread to create a ruffle.
 Lay the first ruffle, right sides together, on top of the false ties so that when you sew it, you are also sewing the false tie into place. In other words the gathered ruffle edge will be sewn onto the bottom edge of the false tie. Once it's sewn...

...fold it over. This is what it should look like. Cut off any extra false ties if you have any. Sew a stitch across the top of the false tie to secure the top in place.

 Add the next row of ruffles 4 inches below the previous ruffle. You can add a fourth row of ruffles if you need to. It all depends on the size of your apron.
 You end up with an untouched apron base, your ruffled apron base, and 4 apron ties all sewn, pulled through to the right side, ironed, and ready to go. (See the flirty apron tutorial for more info about the construction of the ties.)
 Place the ties where they need to be. Two at the top and two at the sides. They need to be situated just how the picture shows. (They need to lay "into" the apron. You will see how it all works in the end.)
 Fold up the ruffles so that they don't hang off the edge of the apron. They need to be out of the way of the sewing needle.
 Place the untouched apron base on top of everything, like a sandwich.
 Pin it together. Make sure to pin where the ties are so you have no problem sewing them in place. Sew around the edge. Leave a gap (about 4 inches wide) open somewhere at the bottom so you can pull everything right side out.
 Here it is pulled right side out.
 Sew the opening closed.

 The ruffle lays over the sewn gap so everything looks really finished.


Happy Thanksgiving!! Enjoy spending time with your family in the kitchen!!

 Add the next row of ruffles 4 inches below the previous ruffle. You can add a fourth row of ruffles if you need to. It all depends on the size of your apron.
 You end up with an untouched apron base, your ruffled apron base, and 4 apron ties all sewn, pulled through to the right side, ironed, and ready to go. (See the flirty apron tutorial for more info about the construction of the ties.)
 Place the ties where they need to be. Two at the top and two at the sides. They need to be situated just how the picture shows. (They need to lay "into" the apron. You will see how it all works in the end.)
 Fold up the ruffles so that they don't hang off the edge of the apron. They need to be out of the way of the sewing needle.
 Place the untouched apron base on top of everything, like a sandwich.
 Pin it together. Make sure to pin where the ties are so you have no problem sewing them in place. Sew around the edge. Leave a gap (about 4 inches wide) open somewhere at the bottom so you can pull everything right side out.
 Here it is pulled right side out.
 Sew the opening closed.
 The ruffle lays over the sewn gap so everything looks really finished.

 Happy Thanksgiving!! Enjoy spending time with your family in the kitchen!!
Stephanie

