

DIY Strip Fabric From a Couch and Reupholster It
10:00 AM
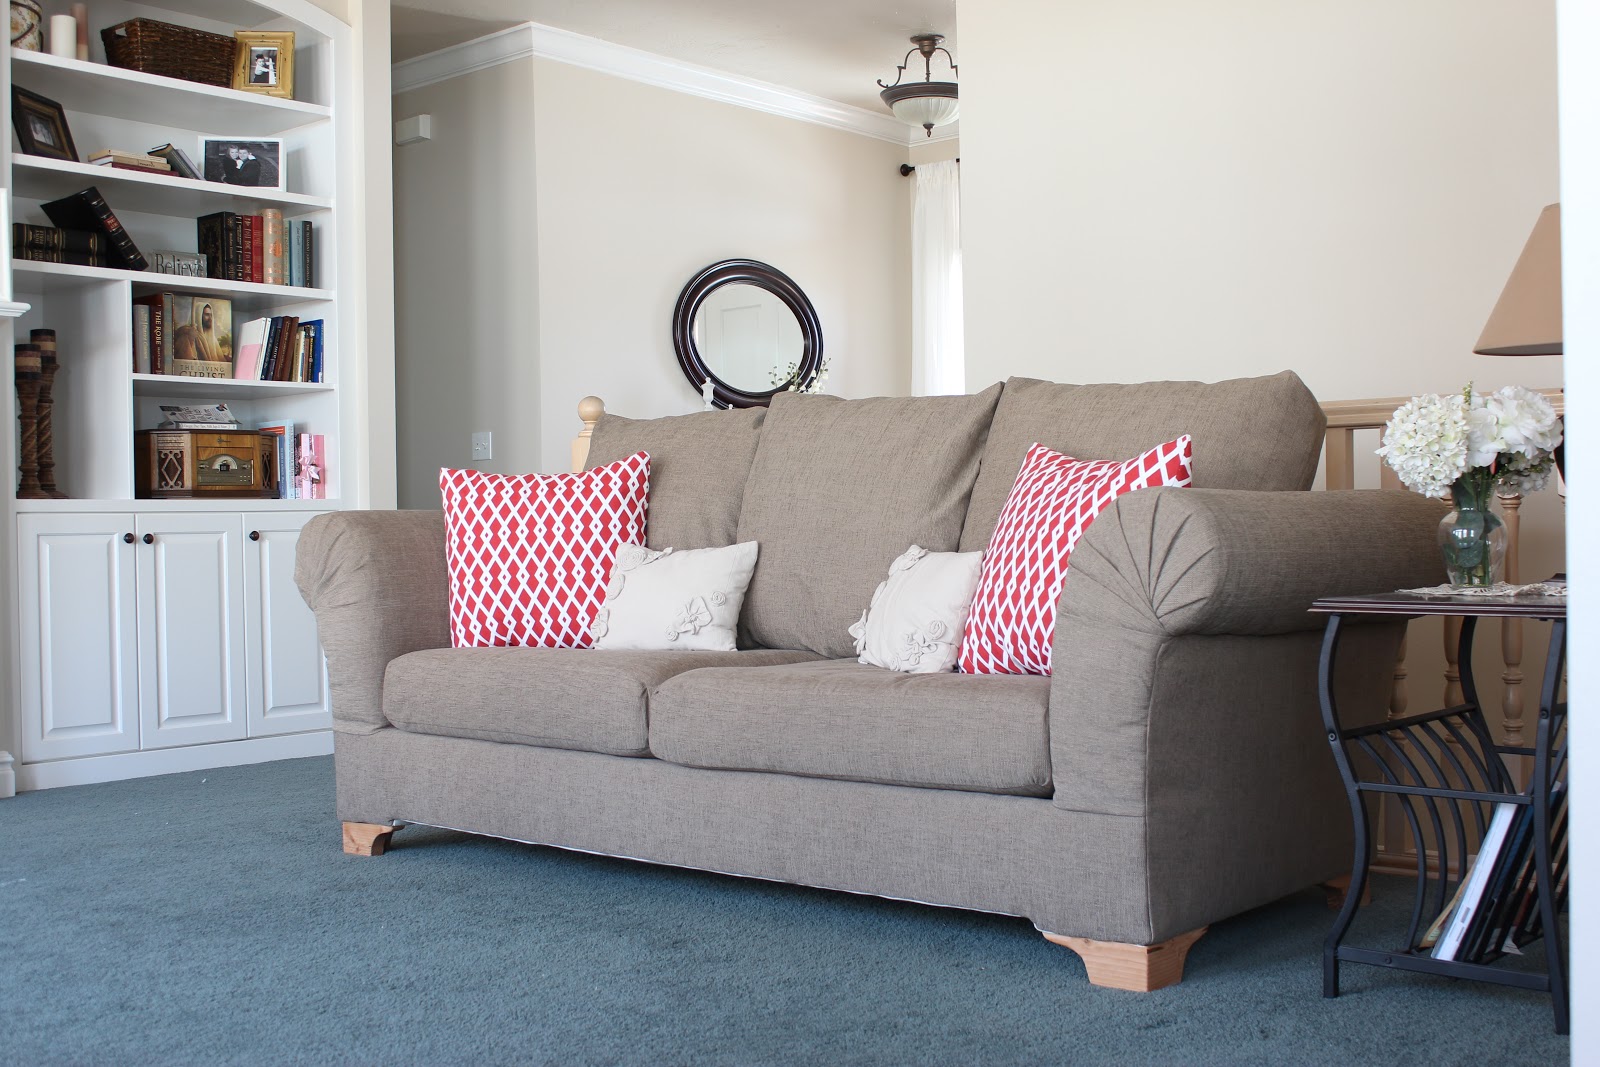
I don't exactly have $$ right now to buy the couch of my dreams, but lucky for me, my husband and I were able to reupholster this beauty. We found a living room set that included a large sofa, love seat, chair and a half, and an ottoman for $50. Engineer hubby and I totally transformed the sofa AND an ottoman for $200 (ottoman will be coming soon). We are going to go through the steps of stripping the fabric off of the couch and reupholstering the couch.
I promise you this is the same exact couch. This proves that almost anything can become something new.


- Step back and look at the couch to determine how many "sections" you will be reupholstering. The "visible" sections for my couch were arms, back of back rest, front of back rest, sides (under arms), front bottom, pillows, and cushions. There were two "hidden" sections which included under the couch and under the seat cushions.
- Typical upholstery fabric is sold on a large bolt that is about 54" wide. Knowing this may help you estimate how much fabric you will need per section.
- Cost to reupholster. A sofa can take anywhere between 12-20 yards of fabric depending on its size and shape. Keep that in mind when choosing fabric; things can get pricey. We used 16 yards on our couch.
- Is the structure sound? Can I reuse the tack strips or any upholstery hardware? Will the feet need to be replaced or renovated? Are the foam cushions worn out or do they have plenty of body left? Is this couch more comfortable than a $200 couch I could buy new? Will any odors remain once the fabric and batting have been removed?
- Our couch was easy to reupholster because the seat cushions and the pillows were detached. I imagine it would be harder to reupholster a couch that had cushions and pillows sewn onto the body of the couch, but I'm sure it can be done with a little determination.

- Couch
- Heavy Duty Upholstery Fabric
- Inexpensive fabric to use in "unseen" places, i.e. muslin
- Staple Gun/ Staples
- Cereal Box Cardboard (we will explain later)
- Batting
- Spray Glue
- Zippers, thread, or anything else needed to sew cushion covers
- Any replacement items for worn out material, i.e. foam or feet
- Pliers
- Hammer
- Sewing Machine (our favorite sewing machine!!)
- Fabric Scissors (hands down, the best fabric scissors.)
- Measuring Tape
- Any other job specific tools

- No continuous pattern. Patterns, such as stripes, can be difficult to line up during reupholstering and may require more material to make patterns align.
- Fabric with a sturdy weave. This may go without saying, but make sure to get a durable fabric that is meant for furniture if you want your legacy to last.
- How much? Remember the sections I talked about? Measure the length of each section and add a few inches extra on each end so you have enough fabric to work with. It would be bad to not have enough, so measure a little generously. We didn't have to worry about the width since 54" wide fabric fit each section on our couch perfectly. As I mentioned above, we used 16 yards on our large sofa.
- Price point. We are on a budget and the fabric had to fit within that budget, so we didn't waste time looking at fabric above a certain price point. Our fabric was about $9 a yard.

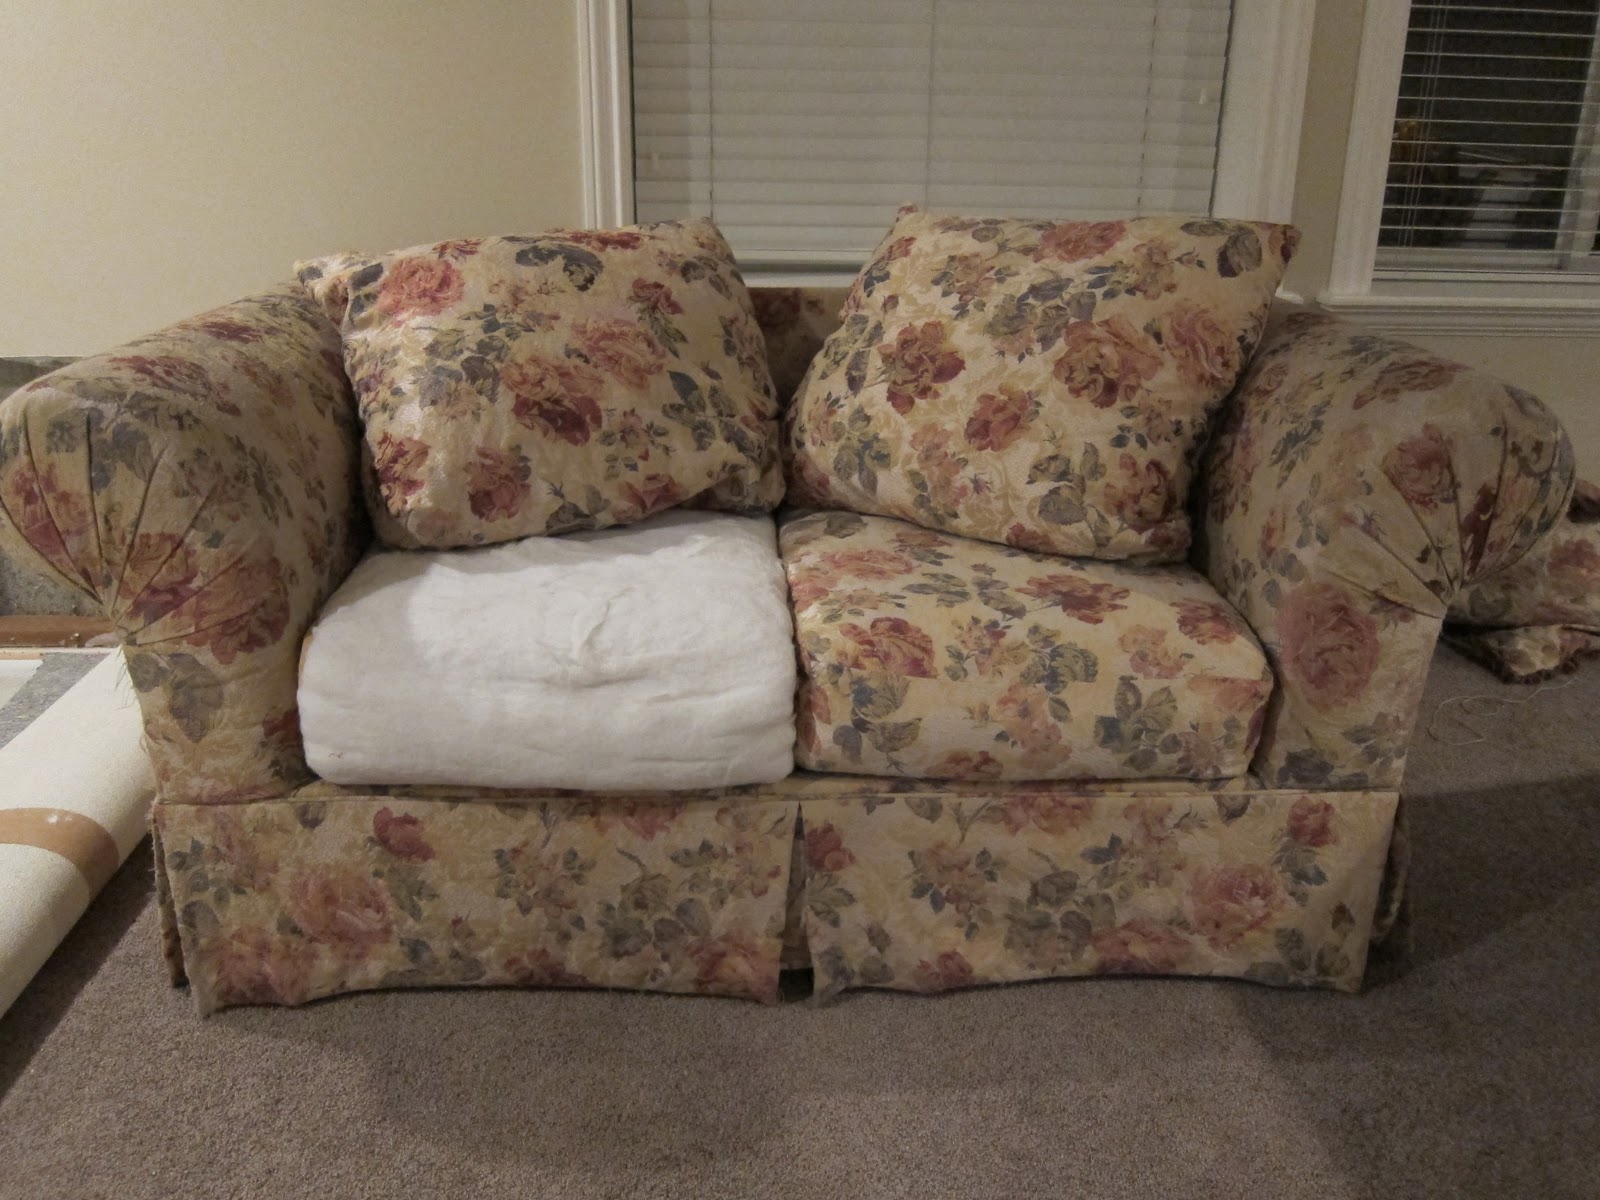
Unfortunately I didn't take a picture of the fabric on the sofa before is was ripped off. Hubby was anxious to get going and started ripping off fabric, batting, and foam, so to give you an idea of what it looked like with it's original fabric, here is the love seat.
Here is the sofa all stripped down with the seat cushions and pillows set aside. Engineer hubby ripped off the fabric, the batting from the whole couch which he thought was holding in all the odors. He also removed the foam from the arms. When we realized that foam is really expensive, we salvaged the original foam and "Lysol-ed" it liberally ;) All that remained of the couch at the end of Step 4 was the wood structure, cardboard on the arms, springs, the blue mesh material covering the springs, foam (foam not pictured), and metal tack strips.


In our case, the next step was to put the foam back on the arms. Foam only covered the front, sides, and tops of the arms. Sadly, I don't have a picture of this so just use your imagination. I did however attach a photo of a roll of foam you can purchase at your local Joanns. It's called High Density Urethane Foam 1"x24"x30". Remember, any staple dimples or irregular shapes in the foam may show through when you cover it with new batting and fabric, so use spray glue on the back and try to staple it nice and evenly on the edges.


New batting stapled into place. You will notice some dimples caused by the staples, but these were not too sever and were easily smoothed out once the fabric was stretched over it. We used about 3 packages of 8oz batting that had been pre-cut for a queen size quilt. (10oz would have been better but it wasn't in stock). You can buy it at Walmart. Roughly cut it into pieces that cover each section of the couch. Sections meaning, front of arms, around each arm, front of couch, and back of couch. Just go for it, it doesn't have to be perfect.

Under side of couch

Notice the feet have been removed. Also notice all the yucky stuff that came out of the couch when it was stripped. Among the "treasure" was 75 cents, "the lost sock", cocoa puffs, the top hat from a Monopoly game, and much more.


We first attached muslin over the seat cushion springs/base (see finished product below).
- Locate areas on the frame of the couch where you can staple the muslin. Cut muslin to fit. Be generous and give yourself plenty of fabric to work with.
- Use the cardboard trick, described two paragraphs below, along the front edge of the couch in order to hide staples and give a uniform edge.
- Fold the muslin over the stapled cardboard strip and tuck under the arm and back.
- Pull the muslin tight and staple to the frame. You will be working under the couch at this point in oder to staple the muslin to the frame.

- Drape a large piece of fabric over the arm of the couch and staple in the joint. Notice how we have a lot of extra fabric hanging off the front and back of the arm. That fabric will be folded into a fan later on.

Use the cardboard trick to attach the fabric to the front of the couch. The cardboard makes it so you don't see any staples and you will see how.
- Place the fabric "right side" to the muslin and a couple inches away from the edge of the couch.
- Cut a few strips of cardboard (cereal boxes work great) about 1/2" wide and as long as the couch goes.
- Staple through the cardboard and the edge of the fabric into the wood frame.


- Flip the fabric over and you have a nice, clean, finished look for the front part of your couch.

- Staple the fabric to the bottom. Wrap and staple the fabric around the sides of the couch about 5 inches.

Notice the front bottom piece. It is tightly secured with staples, no raw edges showing. The back fabric piece is just draped over the back for fun at this point; the next step is to work on the arms again.

Arms. This is the trickiest part.
- Start from the outside of the arm and work your way up, around, and down creating small folds.
- Staple as you go; you can always pull the staples out and readjust.
- When you get close to the end, fold the fabric under to give it a clean finish and staple in place.
- Don't staple on the front of the couch, just pull the fabric tight and staple it in place on the sides of the couch.
- The fold at the bottom of the arm should cover the fold you made earlier on the front bottom piece.
- Trim away bulky fabric as needed. Notice where we stapled. All these staples will be covered by the side fabric piece.
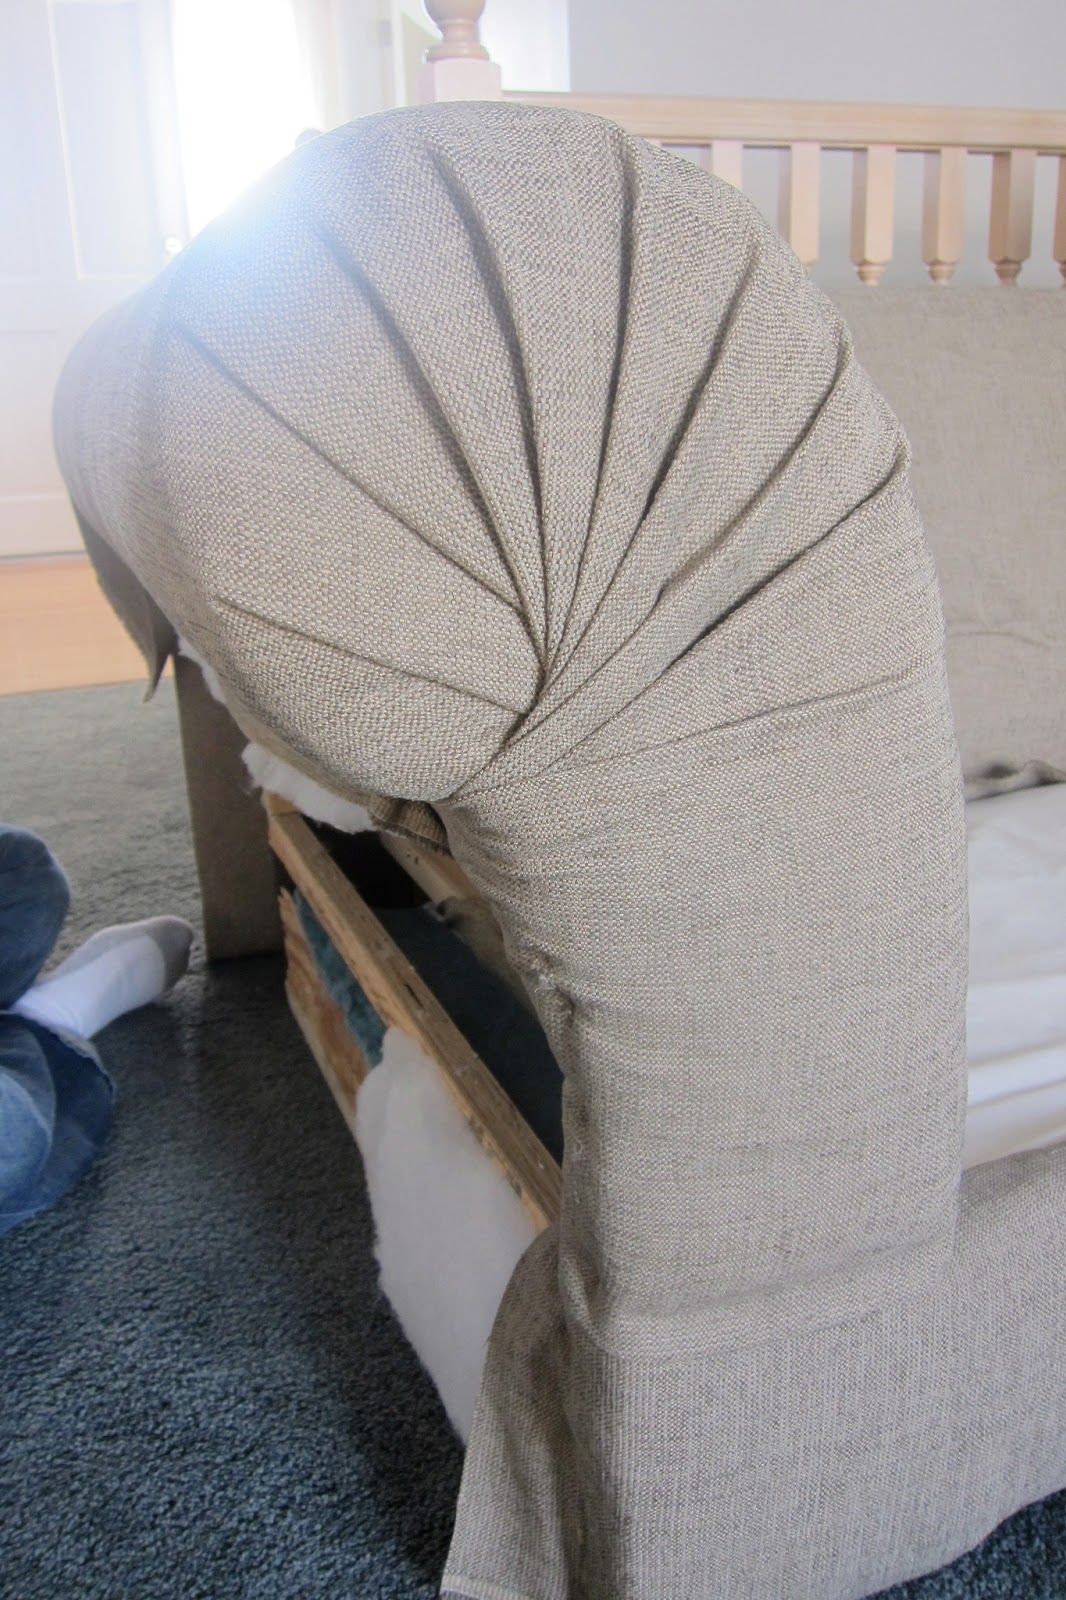
- Move to the back of the arm and follow the same process creating a fan with the extra fabric.

- We applied a little bit of super glue behind the small fan folds to keep them in place. So far so good four months and three kids later!

Here is an overview of what you will be doing to attach the side piece. Notice the order.

- First, use the cardboard trick to attach fabric under the arm curve.
- Second, staple fabric around the back of the couch and staple in place.
- Third, use a tack strip to secure fabric in place on opposite side. This little strip of metal allows us to create a finished edge much like the cardboard trick.
- Along the edge, push tack strip through the back of the fabric.

- Fold it over so that the back of the tack strip is against the back of the fabric.
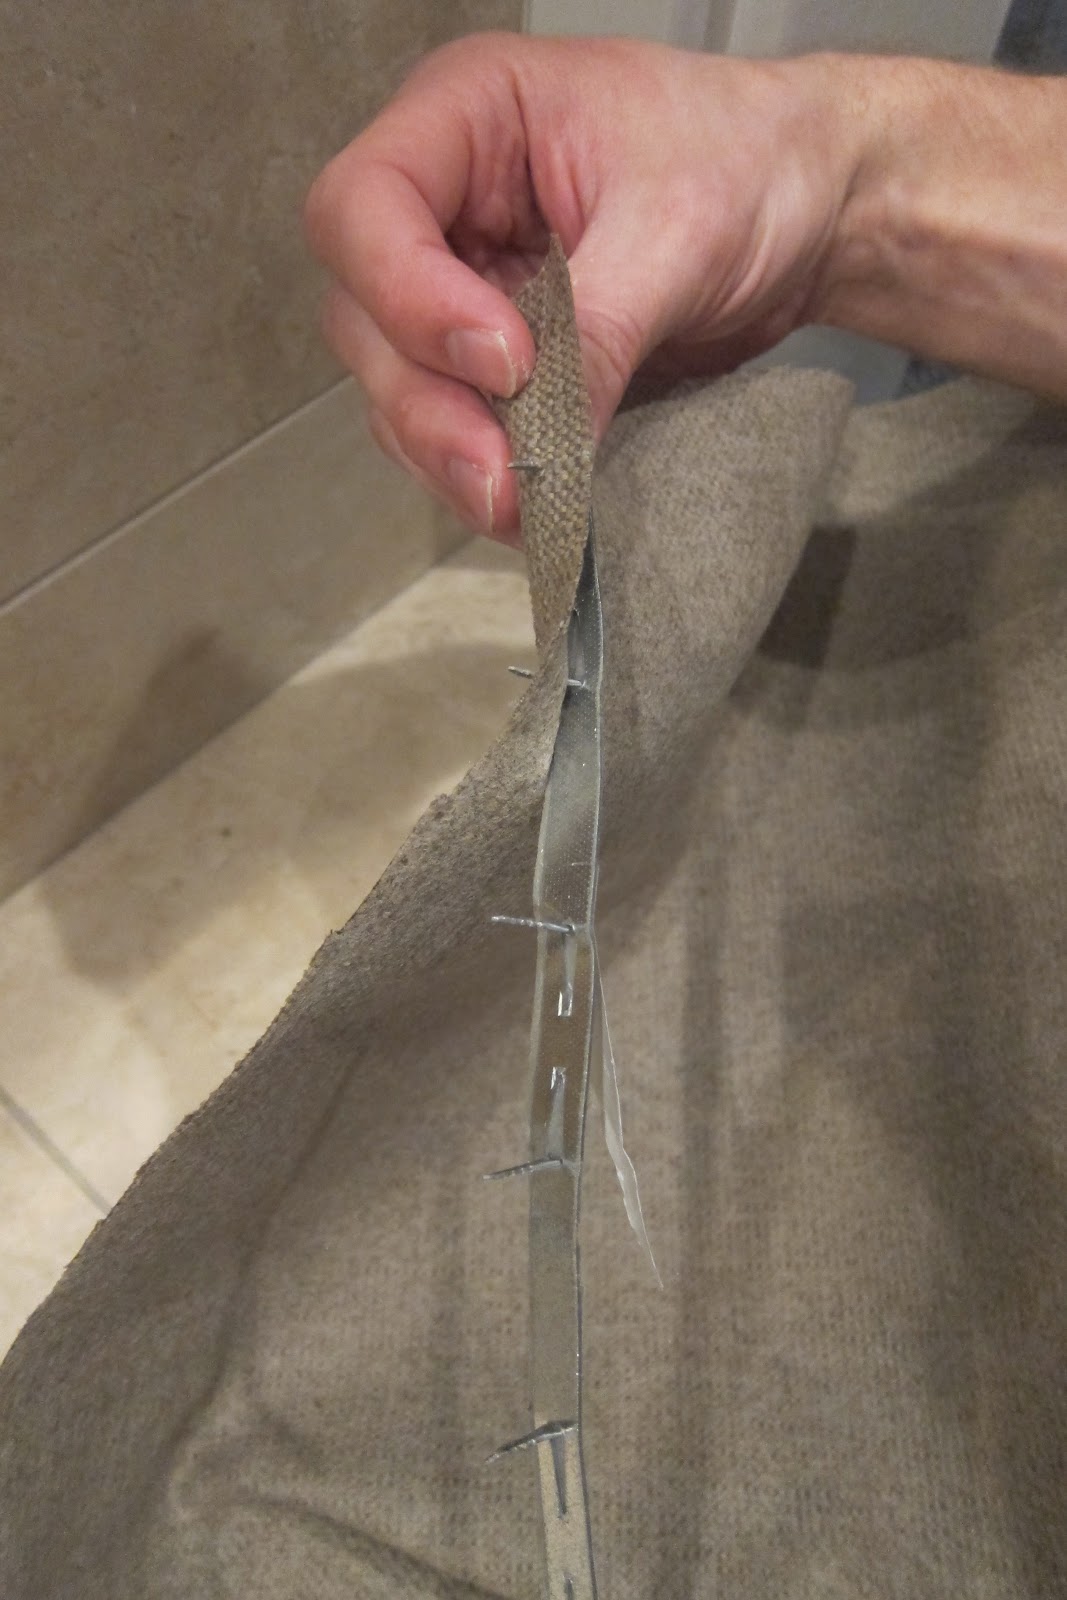
- Hammer the fabric and tack strip into place along the side. Wrap and staple bottom edge of fabric onto the couch.

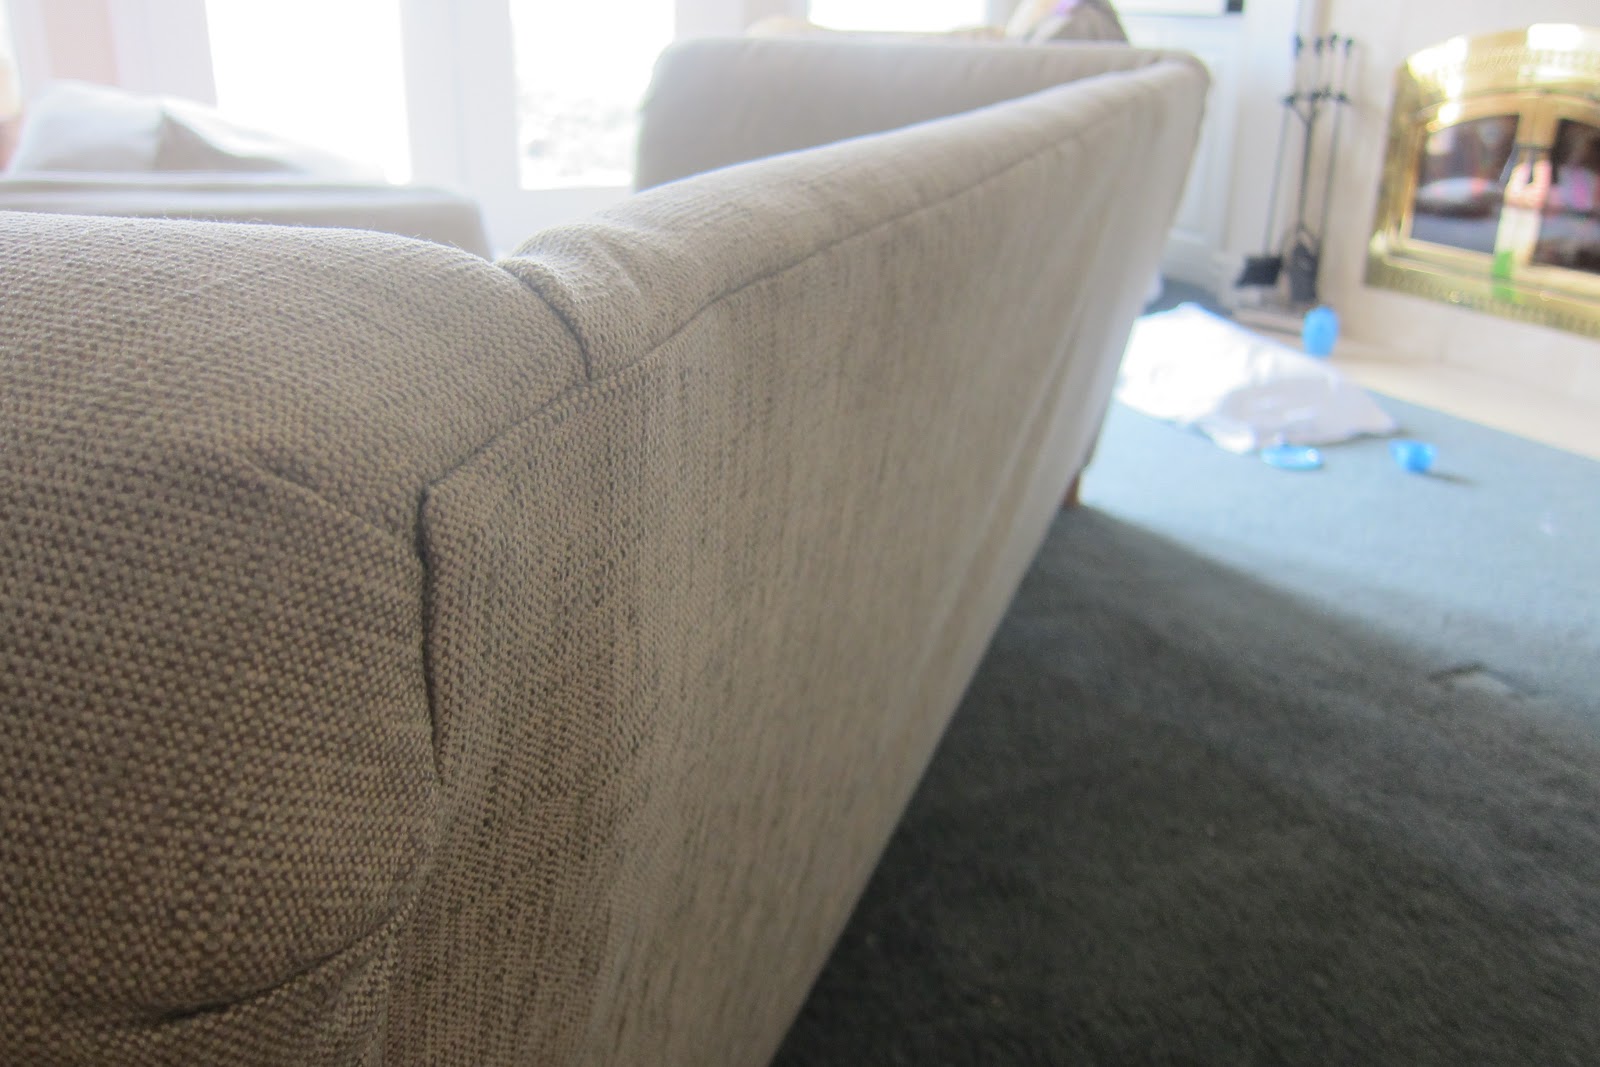
This is what the side should look like finished.

Attach fabric to the "front" of the back rest.
- Use cardboard trick to staple fabric in place along the top of the back frame.
- Flip fabric over to the front of the couch, pull it tight, tuck in bottom, and staple to frame. Make sure the "right side" of your fabric is showing once you flip it over.
- Fold under raw edges on the sides and staple to frame from behind the couch.


Add back piece.
- Use the cardboard trick along to top of the back. Flip fabric over.
- Begin working on the bottom. Wrap bottom fabric under couch and staple. The staples under the couch will be covered by muslin later.
- Then work on the sides of the back piece using tack strips. All staples should be hidden.
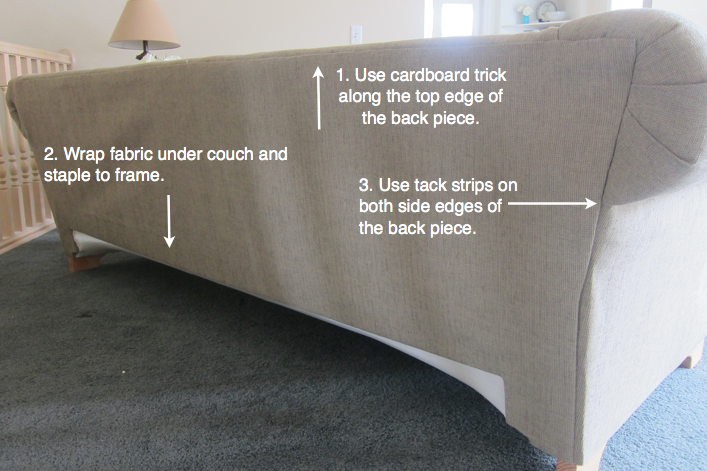
Here is a closer view of the back rest so you can see more clearly what we did and where we used the cardboard trick. Notice that the "front" back piece actually wraps over the top and down the back of the couch a few inches. Then the "back" back piece is stapled on top of the "front" back piece.


Attach the muslin to the "unseen" underside of the couch. No need to make it look pretty. Just cut a piece to fit the bottom and just staple it on. Start on one side and work your way around. Then attach the feet.


Here are the feet Engineer Hubby designed and made since we didn't like the original feet. We really liked the blonde look, but you could always stain them.


We added the center block for extra support.


- Wrap cushions in new batting as pictured.
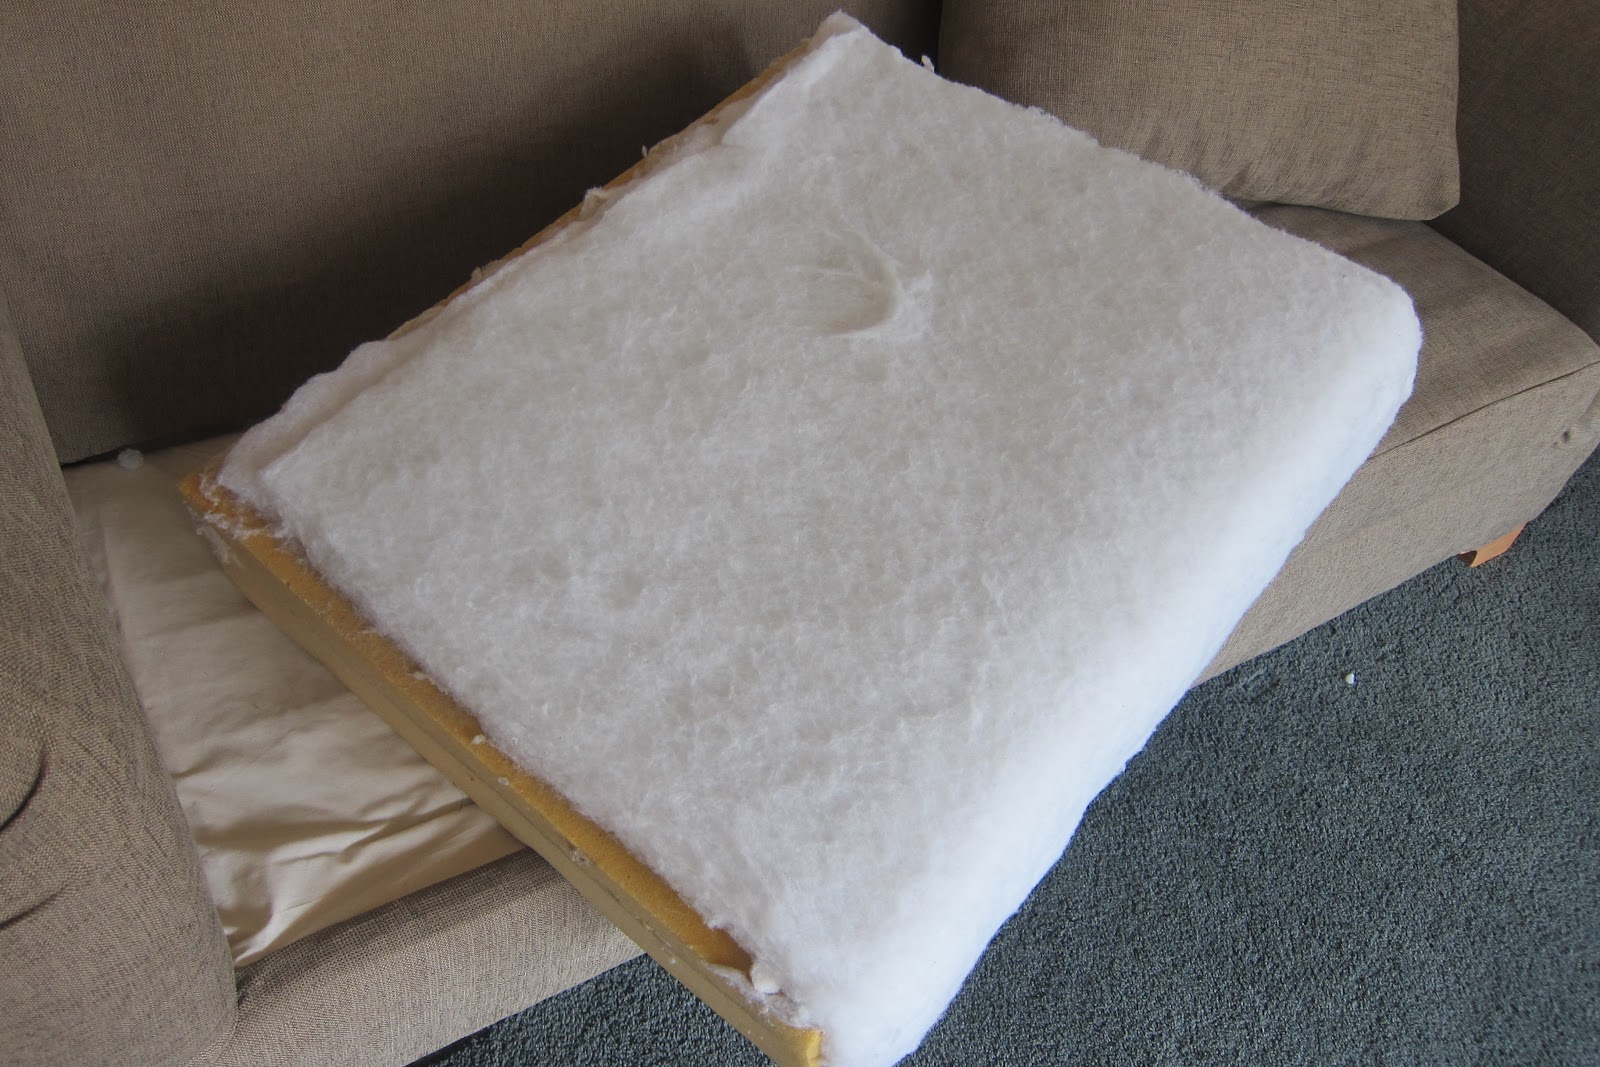

- Use spray glue to secure the batting to the foam cushion.
Make a cushion cover. I used THIS tutorial.

Make Pillow Covers. I made simple envelope pillow covers so I didn't have to sew on a zipper. I used THIS tutorial.

I didn't want the corners of my pillows to poke out, so I just sewed them down into the form.

All done! I promise this look isn't too hard to achieve. Just have patience and always over estimate on your fabric so you have enough.

Stephanie & Engineer Hubby


17 comments
Brave!
ReplyDeleteawesome steph!!!!!
ReplyDeleteWow... I'm duly impressed. i always thought it would be a fun project to recover something... but I think it is best if I never try it!
ReplyDeleteGood for you!!! Awesome job!!! I can't imagine even trying to do something like this.
ReplyDeleteMary
omg. this looks fantastic! The pictures are SUPER helpful! I have big dreams to turn our smaller indoor couch into an outdoor/covered patio couch but i'm having trouble finding good pictures of what I'm going to be facing once I strip it down to the frame. The seat springs are my biggest unknown. Your pictures helped! Thanks and NICE WORK! :)
ReplyDeleteThank you for posting something so helpful! Wondering if you would mind sharing how much time and money you actually spent on it? I am worried I will overestimate, and really should just fork the money over to buy! :)
ReplyDeleteThanks for the tutorial. Wish I would've read it all before I disassembled the couch. https://www.facebook.com/petrajean/media_set?set=a.10151884405610443.1073741827.730270442&type=3
ReplyDeletewhere did you get the tack strip?
ReplyDeleteI love this! I have a sofa and loveseat that I LOVE! But after 3 kids and 12 years, it needs some updating. I've been shopping for years (literally) and have just recently decided that I love my furniture and just need to recover it! Not replace it! Thanks for the awesome instructions and pictures! This will really help!
ReplyDeleteI thought you'd like to know your tutorial helped me on parts of my couch reupholstering. It turned out great! You can see mine here: http://asdeckerfamily.wordpress.com/2014/04/07/reupholstering-the-couch/
ReplyDeletehow long did it take you to do that?
ReplyDeleteWe found a living room set that included a large sofa, love seat, chair ... couchset.blogspot.com
ReplyDeleteWOW, now "I" would totally enjoy trying this; " my electrician hubby" on the other hand, would be afraid of screwing up. Poor guy, but this hunk is about to go to the local dump anyhow, so what would it hurt? Right? It looks like SO much fun!!!!
ReplyDeleteYes, Now I can do Sofa Cleaning easily by myself.
ReplyDeleteHi Stephanie, Sorry know this post has been posted long ago, just want to find out exactly what material you used
ReplyDeleteHi Michelle, I don't know the exact fabric. I do know that I got it from a store in Orem Utah called Home Fabric. They sell upholstery fabric and I chose a gray color. Best of luck to you on your project!
DeleteCleared most of my doubts. Though we had purchased all the materials required, we were quite apprehensive of doing this ourselves..going through your detailed description has given me enough inspiration to start off now. I will try and let you know. Thanks, Vidya:)
ReplyDelete